Introduction & Launcher
Calcam consists of 5 main GUI tools both for performing calibrations and visualising the results / doing some basic image position analysis, which can all be conveniently accessed via the Calcam GUI launcher interface. The launcher is shown below:
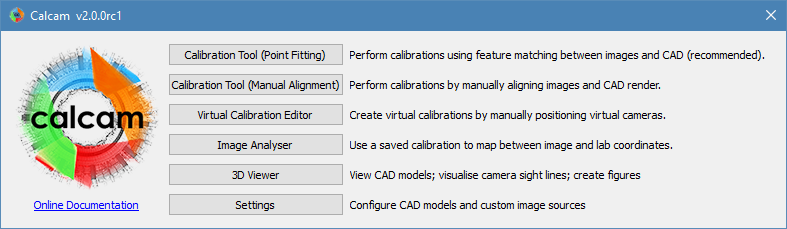
The buttons to the right-hand side of the Calcam logo each open a new python instance running the selected GUI. The details of what each one does and how to use it are given on the other pages in this section.
A link to the online copy of this documentation is provided under the logo in the launcher. The launcher will also check whether you are using the most recent release version of Calcam, and will display a message at the bottom of the window alerting you if a newer version is available. More details of each of the tools are given below.
Starting the launcher
From the executable
At installation, the setup script will create a launcher for the Calcam GUI in your Python environment’s script directory.
If this directory is in your OS’s PATH environment variable, this enables the Calcam GUI to be started directly from a terminal or command prompt simply by typing:
calcam
If the directory is not in the PATH environment variable, you will have to use the full path to the calcam executable. If you will use the GUI often, it is recommended to make a graphical shortcut to it for easy access.
If you need to check the location of the calcam executable, you can find it in the Calcam Settings GUI or from within python using the following code:
import calcam
print(calcam.gui.exe_path)
From within Python
Alternatively, the Calcam GUI launcher can be opened via Python using the command:
python -m calcam
or by calling the start_gui() function in the Calcam Python package:
import calcam
calcam.start_gui()